### [利用Taro + Vue3如何开发小程序?(实践)](https://www.prosaas.cn/article/16317)
**Published:** 2022-01-13T02:28:21
**Author:** 5201314
**Excerpt:** 如何使用 Taro3 + Vue3 开发小程序?下面本篇文章给大家介绍一下使用 Taro3 + Vue3 开发…
如何使用 Taro3 + Vue3 开发小程序?下面本篇文章给大家介绍一下使用 Taro3 + Vue3 开发微信小程序的方法,希望对大家有所帮助!

微信小程序是以微信为运行环境的一种应用,其实质是 `Hybrid` 技术的应用,Hybrid App 即混合模式移动应用,因此与 `H5` 类似,但又比 H5 拥有很多原生的能力,例如调用位置信息和摄像头等。
小程序的开发方式与 H5 十分相似,用的也是 `JavaScript`、`HTML`、`CSS` 语言。
因此,小程序开发可以说是一名前端工程师必须要掌握的技能。
原生小程序开发有一定的学习成本,现如今市面上有很多开发小程序的第三方多端框架,如果不是追求极致性能和稳定,还是不要用原生小程序开发了,开发效率太低。
第三方多端框架中,`taro` 和 `uni-app` 的使用度是最广的,一般来说,做技术选型时,团队用 `react`,就用 taro,团队用 `vue`,就用 uni-app,两者之间没有什么优劣之分,都挺好用的。
但很多开发者可能不知道,taro3.0 以上版本是支持使用 vue 的,本篇文章就来介绍一下如何使用 Taro3 + Vue3 开发微信小程序。
我根据网上的资料完成了本项目的搭建之后,用本项目开发过一个小程序,那种开发体验真的是超越了我以往开发过的所有项目,非常丝滑(可能是我第一次写 vue3 的 script setup 吧,用起来确实很舒服)。
可直接访问本项目 github 地址 clone 使用。
## 目标功能
- 集成 vue3,使用 `script setup` 语法开发
- 集成 `Typescript`
- 代码检查和格式优化
- 全局状态管理
- 小程序分包配置
- 样式封装,兼容刘海儿屏等样式问题
- http 方法封装
## 主要技术栈
- Taro3
- Vue3
- TypeScript
- NutUi
- Pinia
vue3 刚发布时,由于没有合适的 ui 框架支持,我学习 vue3 的热情直接被劝退了。直到现在,类似于 quasar、element-plus、ant-design-vue 等优秀框架陆续支持 vue3,并且许多 vue3 项目被用到了生产环境中,才发现大家是把 vue3 真的用起来了。
比如我们公司隔壁项目组,重构项目就用了 vue3,这时我才发现自己学习 vue3 有点晚了(tips:前端真的太卷了)
NutUI 是京东风格的移动端组件库,它支持使用 Vue 语言来编写可以在 H5,小程序平台上的应用,帮助研发人员提升开发效率,改善开发体验。
我是从 Taro 文档 知道 NutUI 的,taro 官方推荐使用 NutUI 开发,他们似乎也都是来自京东同一个开发团队,我抱着试一试的心态上手使用,使用体验还不错。
Pinia 是一个用于 Vue 的状态管理库,类似 Vuex, 是 Vue 的另一种状态管理方案,支持 Vue2 和 Vue3。
我第一次接触前端状态管理工具,是刚实习时公司的一个后台管理系统,用的 dva,那可叫一个折磨啊,差点直接把我劝退。后面慢慢熟悉了一些,但是不管用 redux,还是 vuex,还是觉得写着麻烦。
这次尝试使用 Pinia,用起来确实很舒服,符合直觉,易于学习 ,有点类似于 recoil,但没有 recoil 那么多的概念和 API,主体非常精简,极易上手。Pinia 快速入门
## vscode 需安装插件
- Eslint
- Prettier
- Volar
与`vetur`相同,`volar`是一个针对 vue 的 vscode 插件,不过与 vetur 不同的是,volar 提供了更为强大的功能。
Volar 介绍
## 搭建项目架构
### 初始化项目
初始化项目之前,需安装 taro,请参考 Taro 文档,完成 taro 安装
使用命令创建模板项目:
taro init myApp
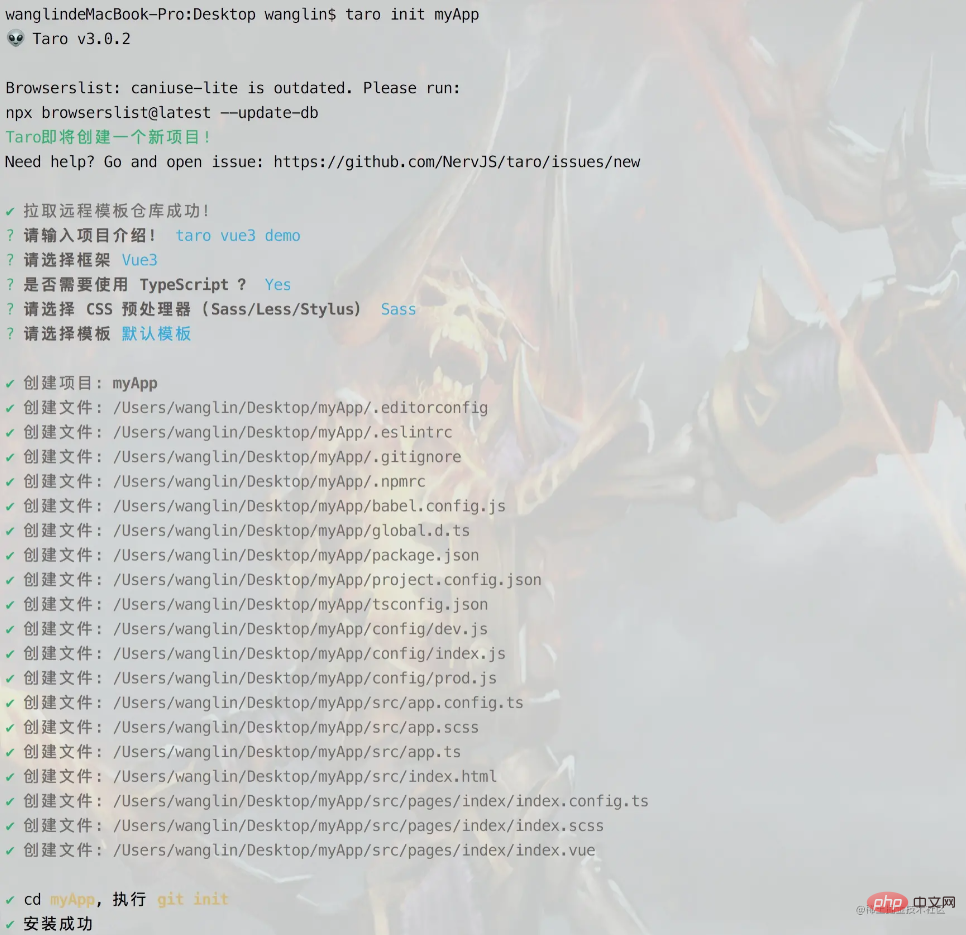
安装 cli 用来执行构建等操作,之后启动项目,会生成一个 dist 目录
yarn add @tarojs/cli
yarn dev:weapp
> 打开微信开发工具 工程目录需要指向构建出来的 dist 文件
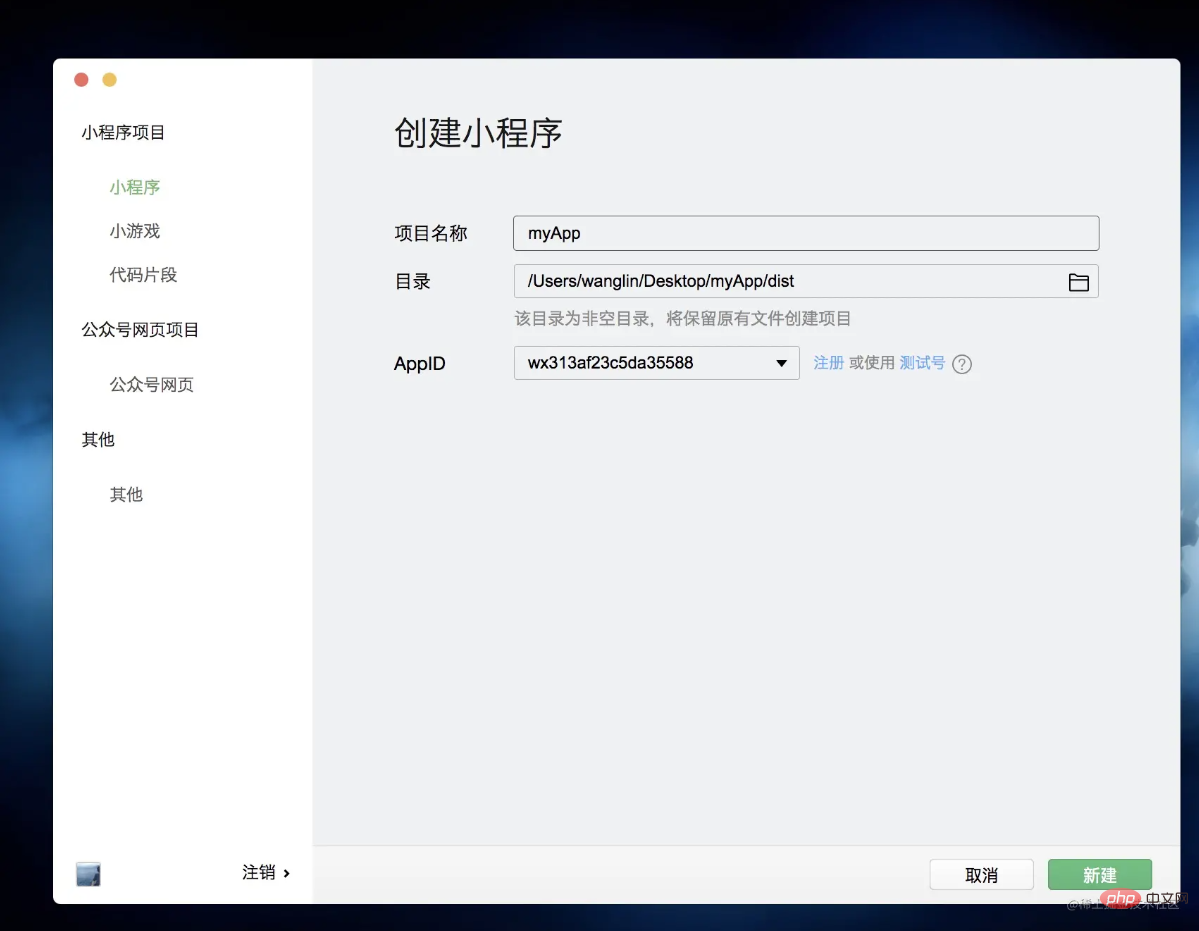
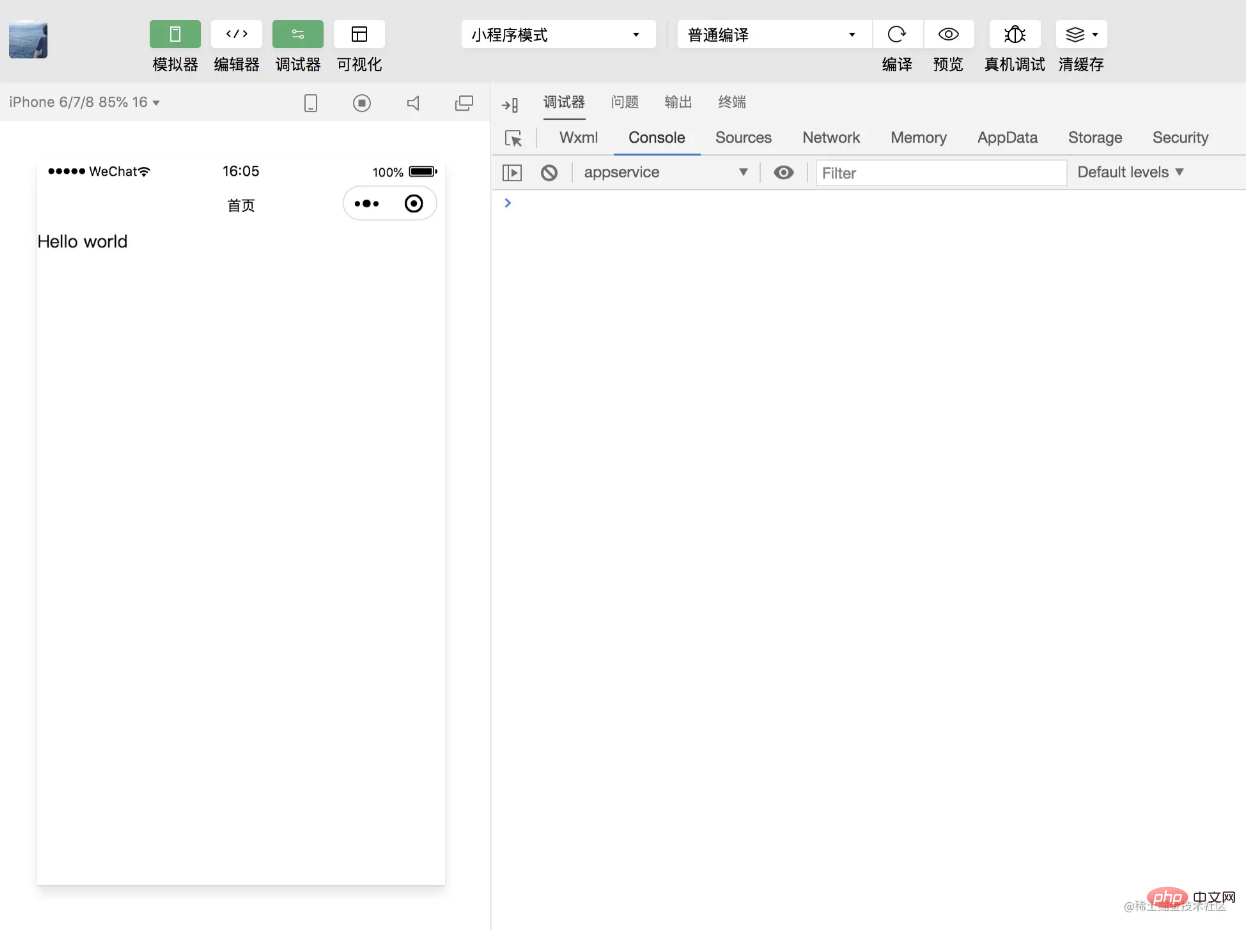
Hello world 出现,项目成功跑起来了!
### 设置代码规范
- 代码规范 ESlint
- 代码格式化 Prettier
- 提交前检查 husky
个人认为,eslint + prettier 足以应付大部分前端代码规范问题了,且配置起来很简单,有特殊需求也可继续配置。
安装依赖
yarn add @vue/eslint-config-prettier @vue/eslint-config-typescript eslint-plugin-prettier vue-tsc husky -D
设置代码规范和格式化规则
.eslintrc.js
module.exports = {
root: true,
env: {
node: true,
'vue/setup-compiler-macros': true
},
extends: \['plugin:vue/vue3-essential', 'eslint:recommended', '@vue/prettier', '@vue/typescript'\],
parserOptions: {
parser: '@typescript-eslint/parser'
},
rules: {
'prettier/prettier': \[
'error',
{
singleQuote: true,
semi: false,
trailingComma: 'none',
arrowParens: 'avoid',
printWidth: 100
}
\],
'no-console': process.env.NODE\_ENV === 'production' ? 'warn' : 'off',
'no-debugger': process.env.NODE\_ENV === 'production' ? 'warn' : 'off'
}
}
.prettierrc
{
"tabWidth": 2,
"singleQuote": true,
"semi": false,
"trailingComma": "none",
"arrowParens": "avoid",
"endOfLine": "auto",
"printWidth": 100
}
在 package.json 中 script 添加 Ts 检查命令和 Eslint 检查命令
"scripts":{
"tsc": "vue-tsc --noEmit --skipLibCheck",
"lint": "eslint --ext .vue --ext .js --ext .ts src/"
}
添加 husky 触发 Git 钩子,代码提交前检查
npx husky install
编辑 pre-commit 执行 Eslint 检查和 Ts 检查
#!/bin/sh
. "$(dirname "$0")/\_/husky.sh"
echo "---eslint start---"
npm run lint
echo "---eslint end---"
echo "---ts lint start---"
npm run tsc
echo "---ts lint end---"
至此,项目的代码规范和格式规范配置完毕,多人协作也不是问题了。
### 引入 NutUI
yarn add @nutui/nutui-taro
在 `.babelrc` 或 `babel.config.js` 中添加配置:
module.exports = {
// ...
plugins: \[
\[
'import',
{
libraryName: '@nutui/nutui',
libraryDirectory: 'dist/packages/\_es',
camel2DashComponentName: false
},
'nutui3-vue'
\],
\[
'import',
{
libraryName: '@nutui/nutui-taro',
libraryDirectory: 'dist/packages/\_es',
camel2DashComponentName: false
},
'nutui3-taro'
\]
\]
}
按需引入,安装插件 babel-plugin-import
yarn add babel-plugin-import -D
样式处理 因为 nutui 的设计稿是 375 的 所以将框架的设计尺寸调整为 375
项目配置文件 config/index.js 中配置:
designWidth: 375
app.ts
import { createApp } from 'vue'
import { Button } from '@nutui/nutui-taro'
const app = createApp()
app.use(Button)
index.vue 中,nut-button 组件直接在 template 中写,不用再引入
{{ msg }}
主要按钮
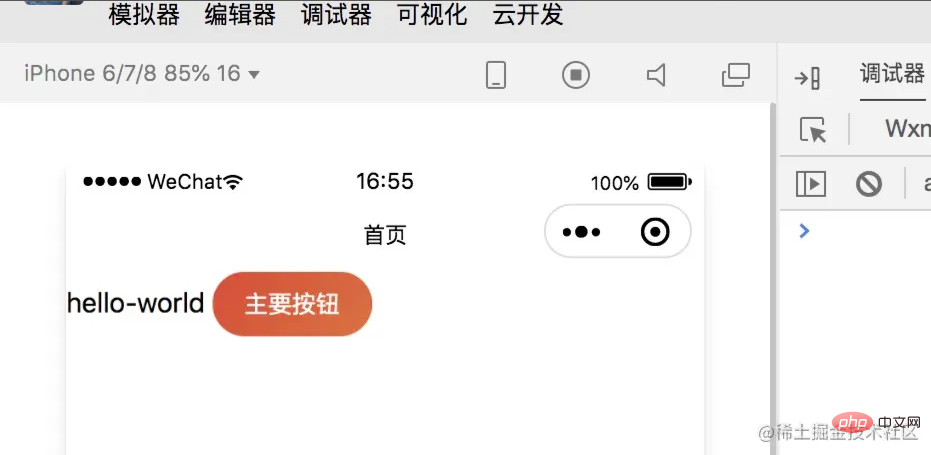
说实话,配置起来还是有点麻烦,不过按照官网文档说明来配也没有踩坑,还行。
### 小程序分包配置
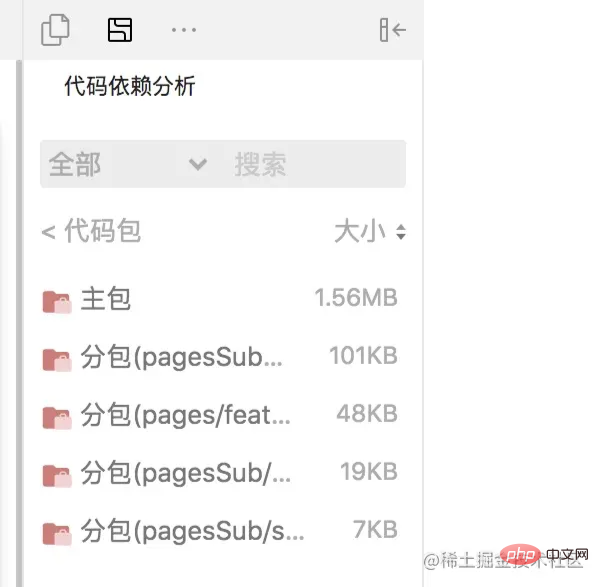
小程序主包超过 2M,就无法真机预览了,为了提前做好准备在一开始就进行分包处理。比如下面这个小程序的配置,分了四个包。
app.config.ts
pages: \['pages/create/index', 'pages/find/index', 'pages/my/index'\],
subpackages: \[
{
root: 'pages/featureA',
pages: \['index/index'\]
},
{
root: 'pagesSub/search',
pages: \['index'\]
},
{
root: 'pagesSub/my',
pages: \['detail/index', 'about/index'\]
},
{
root: 'pagesSub/book',
pages: \['detail/index', 'person/list/index', 'person/detail/index'\]
}
\],
可以在小程序开发工具编辑器里的代码依赖分析,查看主包和分包的大小
### 使用 script setup 语法封装小程序页面生命周期方法
hooks/life.ts
import { getCurrentInstance } from '@tarojs/taro'
import { onMounted } from 'vue'
const Current = getCurrentInstance()
export function useDidShow(callback) {
onMounted(callback) Current?.page?.onShow && (Current.page.onShow = callback)
}
export function usePullDownRefresh(callback) {
Current?.page?.onPullDownRefresh && (Current.page.onPullDownRefresh = callback)
}
使用
import { useDidShow } from '@/hooks/life'
useDidShow(() => {
// console.log('onShow')
})
### 安装 Pinia 进行状态管理
yarn add pinia
yarn add taro-plugin-pinia
项目配置文件 config/index.js 中配置:
plugins: \['taro-plugin-pinia'\]
以管理用户信息和用户登录状态为例,实现一个用户登录功能
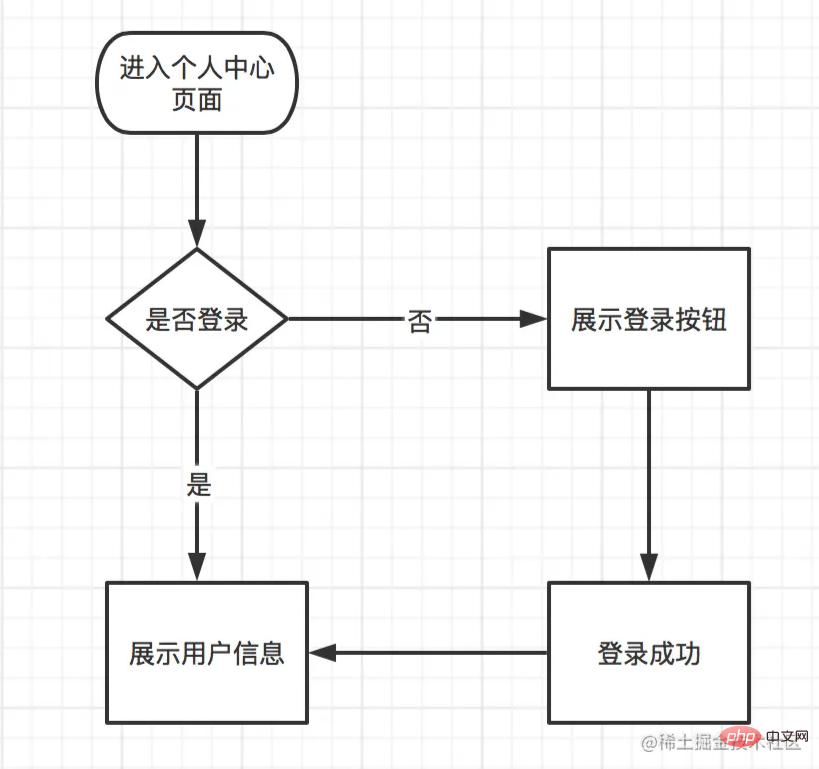
需要处理的文件代码如下:
stores/auth.ts
import { defineStore } from 'pinia'
interface UserInfoProp {
nickName: string
avatarUrl: string
}
const useAuth = defineStore({
id: 'authInfo',
state: () => ({
userInfo: {
nickName: '',
avatarUrl: ''
},
isLogin: false
}),
actions: {
login() {
this.isLogin = true
},
logout() {
this.isLogin = false
},
setUserInfo(userInfo: UserInfoProp) {
this.userInfo = userInfo
}
}
})
export { useAuth }
stores/index.ts
import { createPinia } from 'pinia'
import { useAuth } from './auth'
export const store = createPinia()
const storeObj = {
auth: useAuth
}
// 封装成useStore的形式,这样一看引用就知道是store的数据
export function useStore(key: string) {
return storeObj\[key\]()
}
个人中心 index.vue
微信一键登录
userInfo 组件
{{ userInfo.nickName }}
总的来说, pinia 写起来是非常简洁的,这种类 react hooks 的写法,我是非常喜欢的
### 请求方法封装
http.ts
// 封装axios的请求,返回重新封装的数据格式
// 对错误的统一处理
import { HttpResponse } from '@/common/interface'
import Taro from '@tarojs/taro'
import publicConfig from '@/config/index'
import axios, {
AxiosInstance,
AxiosRequestConfig,
AxiosResponse,
Canceler
} from 'axios-miniprogram'
import errorHandle from '../common/errorHandle'
const CancelToken = axios.CancelToken
class HttpRequest {
private baseUrl: string
private pending: Record
constructor(baseUrl: string) {
this.baseUrl = baseUrl
this.pending = {}
}
// 获取axios配置
getInsideConfig() {
const config = {
baseURL: this.baseUrl,
headers: {
'Content-Type': 'application/json;charset=utf-8'
},
timeout: 10000
}
return config
}
removePending(key: string, isRequest = false) {
if (this.pending\[key\] && isRequest) {
this.pending\[key\]('取消重复请求')
}
delete this.pending\[key\]
}
// 设定拦截器
interceptors(instance: AxiosInstance) {
instance.interceptors.request.use(
config => {
console.log('config :>> ', config)
let isPublic = false
publicConfig.publicPath.map(path => {
isPublic = isPublic || path.test(config.url || '')
})
const token = Taro.getStorageSync('token')
if (!isPublic && token) {
config.headers.Authorization = 'Bearer ' + token
}
const key = config.url + '&' + config.method
this.removePending(key, true)
config.cancelToken = new CancelToken(c => {
this.pending\[key\] = c
})
return config
},
err => {
errorHandle(err)
return Promise.reject(err)
}
)
// 响应请求的拦截器
instance.interceptors.response.use(
res => {
const key = res.config.url + '&' + res.config.method
this.removePending(key)
if (res.status === 200) {
return Promise.resolve(res.data)
} else {
return Promise.reject(res)
}
},
err => {
errorHandle(err)
return Promise.reject(err)
}
)
}
// 创建实例
request(options: AxiosRequestConfig) {
const instance = axios.create()
const newOptions = Object.assign(this.getInsideConfig(), options)
this.interceptors(instance)
return instance(newOptions)
}
get(url: string, config?: AxiosRequestConfig): Promise | Promise {
const options = Object.assign(
{
method: 'get',
url: url
},
config
)
return this.request(options)
}
post(url: string, data?: unknown): Promise | Promise {
return this.request({
method: 'post',
url: url,
data: data
})
}
}
export default HttpRequest
request.ts
import HttpRequest from './http'
import config from '@/config/index'
const baseUrl = process.env.NODE\_ENV === 'development' ? config.baseUrl.dev : config.baseUrl.pro
const request = new HttpRequest(baseUrl)
export default request
以获取图书列表和图书详情为例
apis/book.ts
import request from '../request'
export function getBookList() {
return request.get('books/getBookList')
}
export function getBookDetail(id: number) {
return request.post('books/getBookDetail', {
id
})
}
请求方法封装还是用到了 `axios`,只是用的是 `axios-miniprogram` ,写法和 web 端基本一致,http.js 文件引用的一些模块太多,本文没有列出来,可以直接访问本项目 github 地址查看。
### 样式封装
iPhoneX 底部横线适配
assets/styles/common.scss
.safe-area-bottom {
padding-bottom: constant(safe-area-inset-bottom);
padding-bottom: env(safe-area-inset-bottom);
}
刘海儿屏适配
assets/styles/hairline.scss
@mixin hairline-common() {
position: absolute;
box-sizing: border-box;
content: ' ';
pointer-events: none;
}
@mixin hairline() {
@include hairline-common();
top: -50%;
right: -50%;
bottom: -50%;
left: -50%;
border: 0 solid #eaeaea;
transform: scale(0.5);
}
@mixin hairline-top($color, $left: 0, $right: 0) {
@include hairline-common();
top: 0;
right: $right;
left: $left;
border-top: 1px solid $color;
transform: scaleY(0.5);
}
@mixin hairline-bottom($color, $left: 0, $right: 0) {
@include hairline-common();
right: $right;
bottom: 0;
left: $left;
border-bottom: 1px solid $color;
transform: scaleY(0.5);
}
\[class\*='van-hairline'\] {
&::after {
@include hairline();
}
}
.van-hairline {
&,
&--top,
&--left,
&--right,
&--bottom,
&--surround,
&--top-bottom {
position: relative;
}
&--top::after {
border-top-width: 1px;
}
&--left::after {
border-left-width: 1px;
}
&--right::after {
border-right-width: 1px;
}
&--bottom::after {
border-bottom-width: 1px;
}
&,
&-unset {
&--top-bottom::after {
border-width: 1px 0;
}
}
&--surround::after {
border-width: 1px;
}
}
多行文字省略
assets/styles/ellipsis.scss
@mixin multi-ellipsis($lines) {
display: -webkit-box;
overflow: hidden;
text-overflow: ellipsis;
-webkit-line-clamp: $lines;
-webkit-box-orient: vertical;
}
@mixin ellipsis() {
overflow: hidden;
white-space: nowrap;
text-overflow: ellipsis;
}
.ellipsis {
@include ellipsis();
}
.multi-ellipsis--l2 {
@include multi-ellipsis(2);
}
.multi-ellipsis--l3 {
@include multi-ellipsis(3);
}
## 总结
至此,终于完成了 Taro + Vue3 的项目搭建,强烈建议直接访问项目 github 地址 clone 使用,有一些配置细节本文无法一一列举,就在项目中去发掘吧!
如果我的文章能帮助到你,那将是我的荣幸!
【相关学习推荐:小程序开发教程】
以上就是利用Taro + Vue3如何开发小程序?(实践)的详细内容,更多请关注知企PROSAAS其它相关文章!
**Categories:** 后端开发
---