### [微信小程序--树莓派(raspberry pi)小车控制的代码流程](https://www.prosaas.cn/article/17188)
**Published:** 2018-08-07T02:04:24
**Author:** 5201314
**Excerpt:** 目录1. 基本思路2. 代码结构如下:3. index目录4. control目录 5. 工程全局控制主要练习…
**目录**
1\. 基本思路
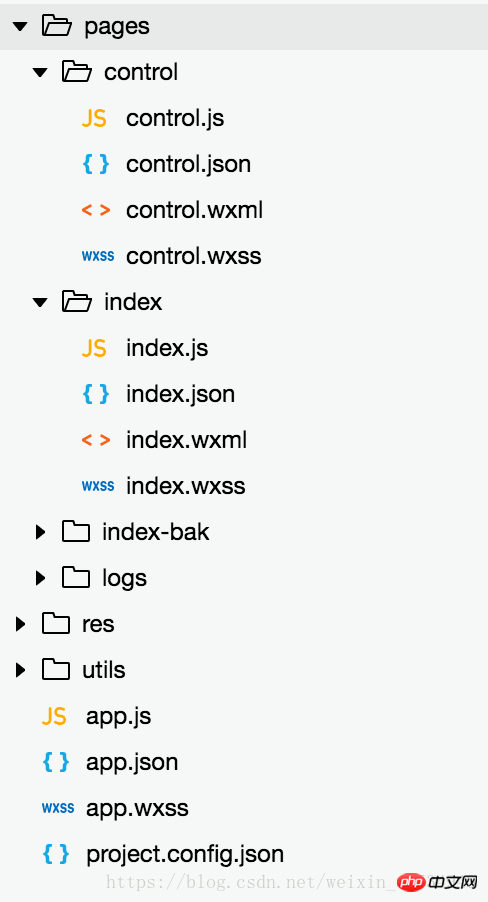
2\. 代码结构如下:
3\. index目录
4\. control目录
5\. 工程全局控制
主要练习了一下微信小程序的开发。这里简单记录一下主要代码片段。也是趟过了许多的坑,例如:微信小程序不支持完全全屏,微信小程序不能横屏展示。所以开发过程中也用了一些非常手段。可以说这只是一个很基本的demo,所以里面很多东西,比如摄像头监控ip、页面元素定位我都使用了写死的值。特别是界面,我只是在iPhone 6上面做的实验,所以换到其他手机上时,界面就会变型了。
# 1\. 基本思路
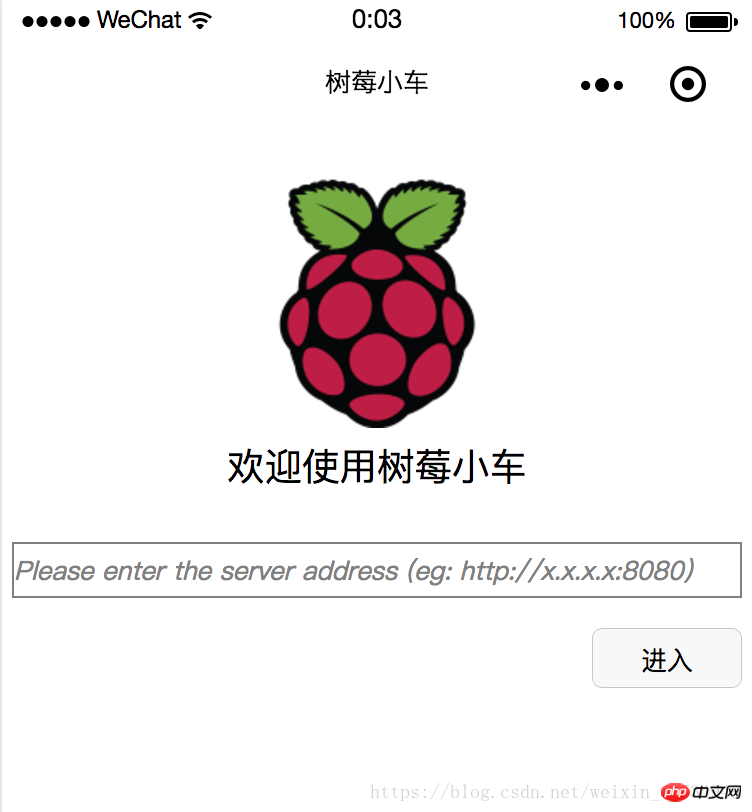
- 进入小程序时展示index页,可以让用户输入服务端url(模拟上一篇中在浏览器获取get请求)
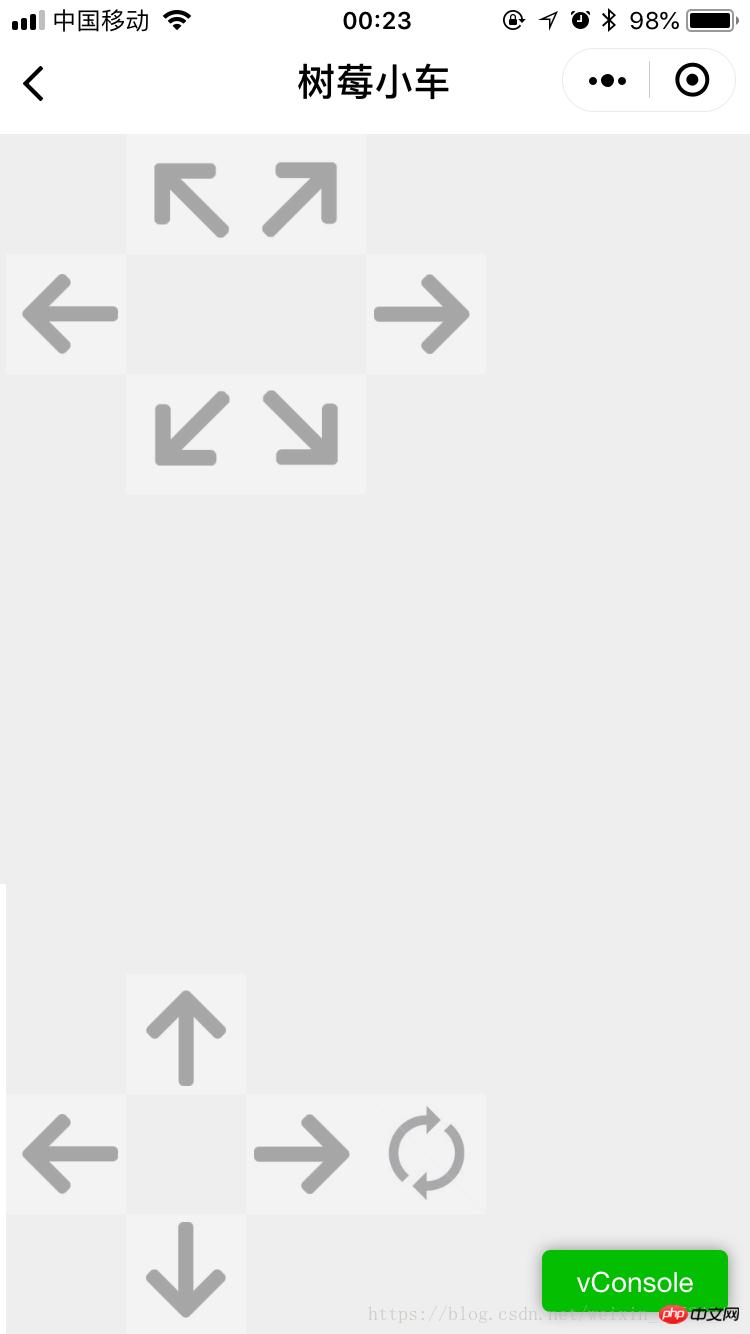
- 然后跳转到实际的小车控制界面,并可以通过点击按钮实现小车控制
- 控制小车的移动,主要是在control.js中定义了界面按钮事件的响应,在响应事件的过程中实现http请求的发送
index页面如下:
进去之后的页面如下(其中中间空白处会展示摄像头监控,不过我并没有启动,所以看不见):
# 2\. 代码结构如下:
其中,index下面是首页,control是控制页面,res目录下存放的是图片资源
# 3\. index目录
- index.js
//index.js
//获取应用实例
const app = getApp()
Page({
data: {
logo: "/res/rasp-logo.png",
welcome: "欢迎使用树莓小车",
enterBtn: "进入",
PromoteMsg: "Please enter the server address (eg: http://x.x.x.x:8080)",
reqURL: ""
},
// 从输入框中获取用户输入的服务器地址信息
getURL: function (e) {
this.setData({
reqURL: e.detail.value
})
},
enterClicked: function (e) {
/\*
\* 当按下进入按钮,需要做以下事情:
\* 1. 首先判断用户是否已经在输入框中输入完整的服务器地址
\* 2. 发起一个到服务器的GET请求,并分析服务器的响应结果
\* 3. 跳转到小车控制界面
\*/
console.log(this.data.reqURL)
if (this.data.reqURL == '') {
wx.showModal({
title: '提示',
content: '请先输入正确的服务器地址!',
})
return
}
// 发起到服务器的GET请求
wx.request({
url: this.data.reqURL,
success: function (res) {
// 在这里获取POST请求地址,以及视频流地址,然后赋值给全局变量,供control页面调用
console.log(res.data.match(/url = \\"(\\S\*)\\"/)\[1\])
console.log(res.data.match(/src=\\"(\\S\*)\\"/)\[1\])
app.globalData.postURL = res.data.match(/url = \\"(\\S\*)\\"/)\[1\]
app.globalData.cameraURL = res.data.match(/src=\\"(\\S\*)\\"/)\[1\]
// 跳转到control页面
wx.navigateTo({
url: '/pages/control/control',
})
},
fail: function(res) {
wx.showModal({
title: '提示',
content: '请检查输入的服务器地址!',
})
}
})
}
})
- index.json:无数据,只有一对打括号
- index.wxml
{{welcome}}
- index.wxss
/\*\*index.wxss\*\*/
.welcome{
display: flex;
margin-top: 50rpx;
flex-direction: column;
align-items: center;
justify-content: space-between;
}
.requestURL{
margin: 50rpx 10rpx 30rpx 10rpx;
border: 1px solid gray;
font-style: italic;
font-size: small
}
.enter{
margin-right: 10rpx;
width: 150rpx;
height: 60rpx;
font-size: small
}
# 4\. control目录
- control.js
// pages/control/control.js
const app = getApp()
Page({
/\*\*
\* 页面的初始数据
\*/
data: {
// Car control images
"forwardBtn": "/res/forward.png",
"leftBtn": "/res/left.png",
"rightBtn": "/res/right.png",
"backLeftBtn": "/res/back-left.png",
"backRightBtn": "/res/back-right.png",
"backBtn": "/res/backward.png",
// Camera control images
"upBtn": "/res/forward.png",
"camLeftBtn": "/res/camLeft.png",
"camRightBtn": "/res/camRight.png",
"downBtn": "/res/backward.png",
"resetBtn": "/res/reset.png"
},
carMove: function(event) {
wx.request({
url: this.data.postURL,
data: event.currentTarget.dataset.direction,
method: "POST",
success: function(res){
},
fail: function(res){
}
})
},
carStop: function(event) {
wx.request({
url: this.data.postURL,
data: "S",
method: "POST",
success: function (res) {
},
fail: function (res) {
}
})
},
camMove: function(event) {
wx.request({
url: this.data.postURL,
data: event.currentTarget.dataset.direction,
method: "POST",
success: function (res) {
},
fail: function (res) {
}
})
},
/\*\*
\* 生命周期函数--监听页面加载
\*/
onLoad: function (options) {
//this.data.cameraURL = app.globalData.cameraURL
this.setData({
cameraURL: app.globalData.cameraURL,
postURL: app.globalData.postURL
})
console.log(this.data.cameraURL)
console.log("post url in control page: " + app.globalData.postURL)
},
/\*\*
\* 生命周期函数--监听页面初次渲染完成
\*/
onReady: function () {
},
/\*\*
\* 生命周期函数--监听页面显示
\*/
onShow: function () {
//console.log(wx.getSystemInfoSync().windowWidth)
//console.log(wx.getSystemInfoSync().windowHeight)
},
/\*\*
\* 生命周期函数--监听页面隐藏
\*/
onHide: function () {
},
/\*\*
\* 生命周期函数--监听页面卸载
\*/
onUnload: function () {
},
/\*\*
\* 页面相关事件处理函数--监听用户下拉动作
\*/
onPullDownRefresh: function () {
},
/\*\*
\* 页面上拉触底事件的处理函数
\*/
onReachBottom: function () {
},
/\*\*
\* 用户点击右上角分享
\*/
onShareAppMessage: function () {
}
})
- control.json
{
"navigationBarBackgroundColor": "#ffffff",
"navigationBarTextStyle": "black",
"navigationBarTitleText": "树莓小车",
"backgroundColor": "#eeeeee",
"backgroundTextStyle": "light",
"enablePullDownRefresh": false,
"navigationStyle": "custom",
"disableScroll": true
}
- control.wxml
- control.wxss
/\* pages/control/control.wxss \*/
.control {
width: 100%;
height: 100%;
transform: rotate(90deg);
background-color: #eee;
justify-content: center;
}
.cameraView {
margin-left: 0px;
width: 603px;
height: 375px;
background-color: #eee;
justify-content: center;
}
.button {
height: 60px;
width: 60px;
opacity: 0.3;
}
#forward {
left: 60px;
top: 135px;
}
#left {
left: 0px;
top: 195px;
}
#right {
left: 120px;
top: 195px;
}
#backLeft {
left: 0px;
top: 255px;
}
#backRight {
left: 120px;
top: 255px;
}
#back {
left: 60px;
top: 315px;
}
#up {
left: 480px;
top: 195px;
}
#camLeft {
left: 420px;
top: 255px;
}
#camRight {
left: 540px;
top: 255px;
}
#down {
left: 480px;
top: 315px;
}
#reset{
left: 480px;
top: 135px
}
# 5\. 工程全局控制
- app.js:实际似乎并没有用到,里面都是工程创建时的默认代码
//app.js
App({
onLaunch: function () {
// 展示本地存储能力
var logs = wx.getStorageSync('logs') || \[\]
logs.unshift(Date.now())
wx.setStorageSync('logs', logs)
// 登录
wx.login({
success: res => {
// 发送 res.code 到后台换取 openId, sessionKey, unionId
}
})
// 获取用户信息
wx.getSetting({
success: res => {
if (res.authSetting\['scope.userInfo'\]) {
// 已经授权,可以直接调用 getUserInfo 获取头像昵称,不会弹框
wx.getUserInfo({
success: res => {
// 可以将 res 发送给后台解码出 unionId
this.globalData.userInfo = res.userInfo
// 由于 getUserInfo 是网络请求,可能会在 Page.onLoad 之后才返回
// 所以此处加入 callback 以防止这种情况
if (this.userInfoReadyCallback) {
this.userInfoReadyCallback(res)
}
}
})
}
}
})
},
globalData: {
userInfo: null,
postURL: null,
cameraURL: null
}
})
- app.json:
{
"pages": \[
"pages/index/index",
"pages/control/control"
\],
"window": {
"backgroundTextStyle": "light",
"navigationBarBackgroundColor": "#fff",
"navigationBarTitleText": "树莓小车",
"navigationBarTextStyle": "black",
"showStatusBar": false
}
}
- app.wxss:
/\*\*app.wxss\*\*/
.container {
height: 100%;
display: flex;
flex-direction: column;
align-items: center;
justify-content: space-between;
padding: 200rpx 0;
box-sizing: border-box;
}
- project.control.json:
{
"description": "项目配置文件。",
"packOptions": {
"ignore": \[\]
},
"setting": {
"urlCheck": false,
"es6": true,
"postcss": true,
"minified": true,
"newFeature": true
},
"compileType": "miniprogram",
"libVersion": "2.0.4",
"appid": "wx18414b9f85bfc895",
"projectname": "wechat-control",
"isGameTourist": false,
"condition": {
"search": {
"current": -1,
"list": \[\]
},
"conversation": {
"current": -1,
"list": \[\]
},
"game": {
"currentL": -1,
"list": \[\]
},
"miniprogram": {
"current": -1,
"list": \[\]
}
}
}
相关推荐:
树莓派(Raspberry Pi,RPi)的详细介绍
用树莓派实现对话机器人\_PHP教程
以上就是微信小程序--树莓派(raspberry pi)小车控制的代码流程的详细内容,更多请关注知企PROSAAS其它相关文章!
**Tags:** http, iphone, JS, json, 事件, 微信小程序
**Categories:** 后端开发
---