### [微信小程序图片选择区域裁剪实现方法](https://www.prosaas.cn/article/17386)
**Published:** 2018-06-23T07:56:02
**Author:** 5201314
**Excerpt:** 本篇文章主要介绍了微信小程序图片选择区域屏裁剪实现方法,小编觉得挺不错的,现在分享给大家,也给大家做个参考。一…
本篇文章主要介绍了微信小程序图片选择区域屏裁剪实现方法,小编觉得挺不错的,现在分享给大家,也给大家做个参考。一起跟随小编过来看看吧
本文介绍了微信小程序图片选择区域屏裁剪实现方法,分享给大家。具体如下:
效果图
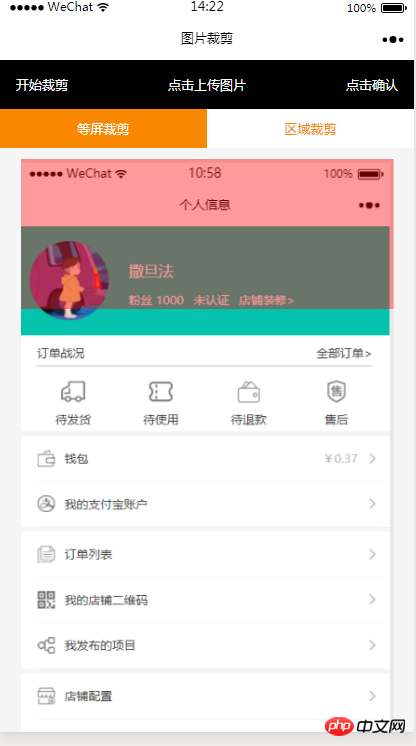
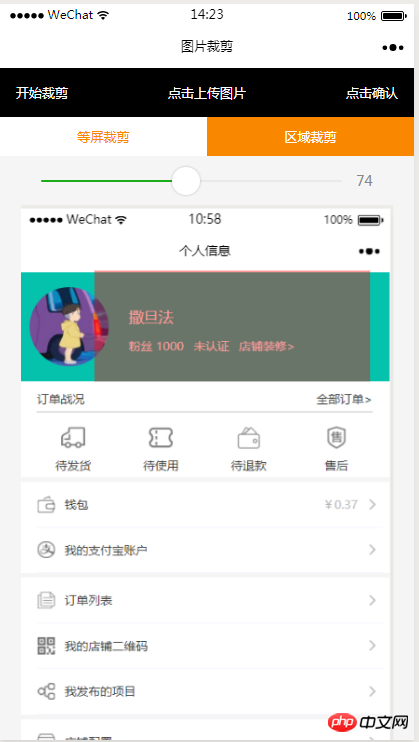
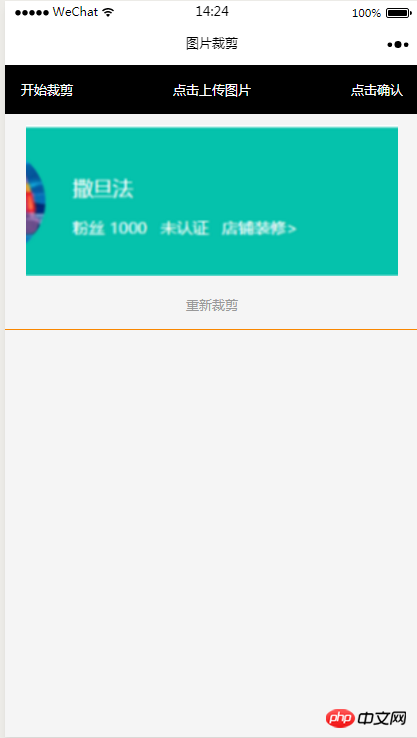
HTML代码
等屏裁剪
区域裁剪
重新裁剪
CSS代码
.imgCut\_header{
padding: 30rpx;
display: flex;
justify-content: space-between;
align-items: center;
background: #000;
color: #fff;
font-size: 24rpx;
}
.allCavans{
margin: 20rpx auto;
position: relative;
}
.canvasSty{
position: absolute;
}
.cutImg\_box{
width: 100%;
border-bottom: 2rpx #f98700 solid;
padding-bottom: 20rpx;
}
.cutImg\_box .cutImg\_box\_t{
width: 90%;
margin: 20rpx auto;
}
.cutImg\_box image{
width: 100%;
}
.cutImg\_box .cutImg\_box\_b{
margin-top: 20rpx;
width: 80%;
height: 80rpx;
line-height: 80rpx;
background: #f98700;
color: #fff;
border-radius: 10rpx;
text-align: center;
margin:0rpx auto;
}
.selectCutMode{
background: #fff;
display: flex;
justify-content: space-between;
align-items: center;
}
.selectCutMode .selectCutMode\_in{
width: 100%;
text-align: center;
background: #fff;
color: #f98700;
font-size: 24rpx;
padding: 20rpx;
}
.selectCutMode .selectCutMode\_in\_act{
background: #f98700;
color: #fff;
padding: 20rpx;
}
.areaSelct\_box{
width: 100%;
display: flex;
align-items: center;
height: 50rpx;
justify-content: center;
margin-top: 20rpx;
}
.areaSelct\_box slider{
width: 80%;
}
.cutImg\_box .clickCutImg\_txt{
width: 100%;
text-align: center;
height: 50rpx;
font-size: 24rpx;
line-height: 50rpx;
color: #999;
}
JS代码部分
初始加载带入上一个页面带过来的参数路径
onLoad: function (options) {
var that = this;
const ctx = wx.createCanvasContext('cutImg');
ctx.setGlobalAlpha(0.4)
var aa = 'https://pintuanqu.oss-cn-hangzhou.aliyuncs.com/Uploads/Picture/goodsShow/20171201/5a2125fc86566.png'
//获取当前屏幕宽度
var phoneW = Number(util.nowPhoneWH()\[0\]\*90)/100;
var cutH = 150;
wx.getImageInfo({
src: aa,
success: function (res) {
var w = phoneW;
var h = (phoneW/Number(res.width))\*Number(res.height)
ctx.save()
ctx.drawImage(aa, 0, 0, w, h)
ctx.restore()
ctx.setFillStyle('red')
ctx.fillRect(0, 0, phoneW, cutH)
ctx.draw()
that.setData({
canvasW:w,
canvasH:h,
img:aa,
cutH:cutH
})
}
})
},
确定选择区域开始裁剪
// 点击确认裁剪图片
okCutImg:function(){
var that = this;
var canvasW = that.data.canvasW;
var canvasH = that.data.canvasH;
var nowCutW = that.data.cutType?canvasW:that.data.nowCutW;
var nowCutH = that.data.cutType?that.data.cutH:that.data.nowCutH;
var cutX = that.data.cutX;
var cutY = that.data.cutY;
const ctx = wx.createCanvasContext('cutImg');
ctx.setGlobalAlpha(1)
ctx.drawImage(that.data.img, 0, 0, canvasW, canvasH)
ctx.draw()
wx.canvasToTempFilePath({
x: cutX,
y: cutY,
width: nowCutW,
height: nowCutH,
destWidth: nowCutW,
destHeight: nowCutH,
canvasId: 'cutImg',
success: function(res) {
var aa = res.tempFilePath
that.setData({
cutImgUrl:aa,
prienFlag:false,
alreay:false
})
}
})
},
红框根据手指移动方法
// 点击红框开始移动
canvasMove:function(e){
var that = this;
var canvasW = that.data.canvasW;
var canvasH = that.data.canvasH;
var nowCutW = that.data.cutType?canvasW:that.data.nowCutW;
var nowCutH = that.data.cutType?that.data.cutH:that.data.nowCutH
var touches = e.touches\[0\];
var x = touches.x;
var y = touches.y-(Number(nowCutH)/2);
that.data.cutType?x=0:x=x-(Number(nowCutW)/2);
that.setData({
cutX:x,
cutY:y
})
const ctx = wx.createCanvasContext('cutImg');
ctx.setGlobalAlpha(0.4)
ctx.drawImage(that.data.img, 0, 0, canvasW, canvasH)
ctx.setFillStyle('red')
ctx.fillRect(x, y, nowCutW, nowCutH)
ctx.draw()
},
上方两个选择裁剪方式的按钮
等屏裁剪
//等屏裁剪
etcType:function(){
var that = this;
var propor = 100;
var canvasW = that.data.canvasW;
var canvasH = that.data.canvasH;
var cutH = that.data.cutH;
var nowCutW = (Number(canvasW)\*propor)/100
var nowCutH = (Number(cutH)\*propor)/100
const ctx = wx.createCanvasContext('cutImg');
ctx.setGlobalAlpha(0.4)
ctx.drawImage(that.data.img, 0, 0, canvasW, canvasH)
ctx.setFillStyle('red')
ctx.fillRect(0, 0, nowCutW, nowCutH)
ctx.draw()
that.setData({
nowCutW:nowCutW,
nowCutH:nowCutH,
cutType:true
})
},
局域裁剪
areaType:function(){
var that = this;
var propor = that.data.propor;
var canvasW = that.data.canvasW;
var canvasH = that.data.canvasH;
var cutH = that.data.cutH;
var nowCutW = (Number(canvasW)\*propor)/100
var nowCutH = (Number(cutH)\*propor)/100
const ctx = wx.createCanvasContext('cutImg');
ctx.setGlobalAlpha(0.4)
ctx.drawImage(that.data.img, 0, 0, canvasW, canvasH)
ctx.setFillStyle('red')
ctx.fillRect(0,0, nowCutW, nowCutH)
ctx.draw()
that.setData({
nowCutW:nowCutW,
nowCutH:nowCutH,
cutType:false
})
},
局域裁剪上方的滑动选择红框根据宽度等比例缩放
areaChange:function(e){
var that = this;
var propor = e.detail.value;
var canvasW = that.data.canvasW;
var canvasH = that.data.canvasH;
var cutH = that.data.cutH;
var nowCutW = (Number(canvasW)\*propor)/100
var nowCutH = (Number(cutH)\*propor)/100
const ctx = wx.createCanvasContext('cutImg');
ctx.setGlobalAlpha(0.4)
ctx.drawImage(that.data.img, 0, 0, canvasW, canvasH)
ctx.setFillStyle('red')
ctx.fillRect(that.data.cutX||0, that.data.cutY||0,nowCutW, nowCutH)
ctx.draw()
that.setData({
nowCutW:nowCutW,
nowCutH:nowCutH,
propor:propor
})
},
重新裁剪回到初始选择图片的页面
// 重新裁剪
againBtn:function(){
var that = this;
var data = that.data
this.setData({
prienFlag:true,
alreay:true
})
const ctx = wx.createCanvasContext('cutImg');
ctx.setGlobalAlpha(0.4)
ctx.drawImage(data.img, 0, 0, data.canvasW, data.canvasH)
ctx.setFillStyle('red')
ctx.fillRect(that.data.cutX||0, that.data.cutY||0, data.nowCutW||data.canvasW, data.nowCutH||data.cutH)
ctx.draw()
},
现在IOS还有个坑就是裁剪不了,官方正在修复不知道什么时候好
以上就是本文的全部内容,希望对大家的学习有所帮助,更多相关内容请关注PHP中文网!
相关推荐:
微信小程序多张图片上传功能的实现
微信小程序实现登录页云层漂浮的动画效果
以上就是微信小程序图片选择区域裁剪实现方法的详细内容,更多请关注知企PROSAAS其它相关文章!
**Tags:** css, html, ios, JS, php, 微信小程序
**Categories:** 后端开发
---