### [在基于 React 的博客应用程序中更新和删除帖子:第 4 部分](https://www.prosaas.cn/article/4466)
**Published:** 2023-09-04T01:05:01
**Author:** 5201314
**Excerpt:** 在本教程系列的前一部分中,您了解了如何实现添加和显示帖子功能。在有关在 React 中创建博客应用程序的教程系…
在本教程系列的前一部分中,您了解了如何实现添加和显示帖子功能。在有关在 React 中创建博客应用程序的教程系列的这一部分中,您将实现更新和删除博客文章的功能。
## 开始使用
让我们开始克隆本系列最后一部分的源代码。
https://github.com/royagasthyan/ReactBlogApp-AddPost
克隆目录后,导航到项目目录并安装所需的依赖项。
cd ReactBlogApp-AddPost
npm install
启动 Node.js 服务器,应用程序将在 http://localhost:7777/index.html#/ 上运行。
## 创建更新和删除视图
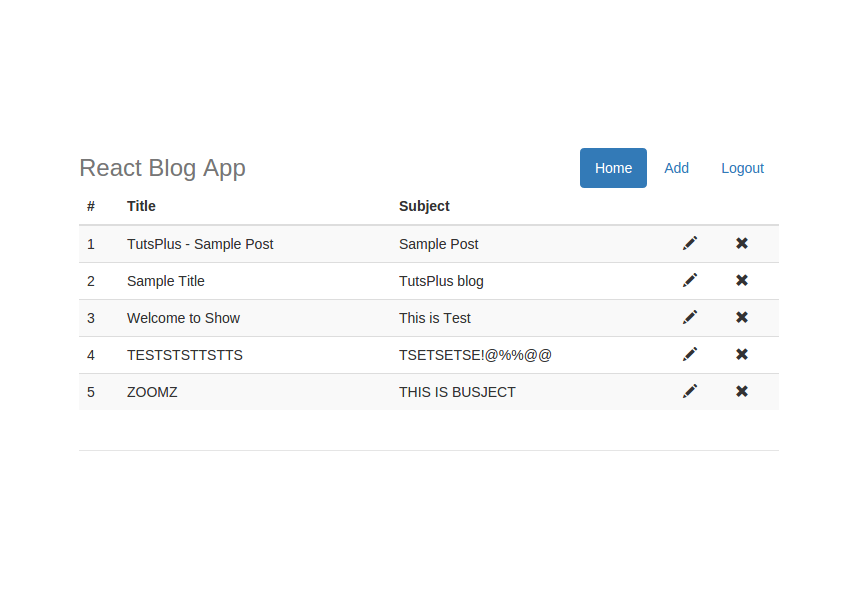
让我们修改博客文章列表,以带有更新和删除图标的表格形式显示数据。在 `ShowPost` 组件的 render 方法中,将现有的 `div` 替换为表格,如代码所示:
| # |
Title |
Subject |
|
|
{
this.state.posts.map(function(post,index) {
return
| {index+1} |
{post.title} |
{post.subject} |
|
|
}.bind(this))
}
如上面的代码所示,您已修改现有代码以以表格形式显示帖子。您已映射 `posts` 变量以迭代 posts 集合并动态创建所需的 `tr` 和 `td`。
保存以上更改并重新启动服务器。将浏览器指向 http://localhost:7777/home#/,您应该能够以表格格式查看博客文章列表。
## 实现更新发布功能
要实现更新发布功能,您需要将单击事件附加到编辑图标。修改编辑图标`span`如图:
如上面的代码所示,您已将帖子 ID 作为参数传递给 `updatePost` 方法。
在 `ShowPost` 组件内创建一个方法 `updatePost` 。
updatePost(id){
hashHistory.push('/addPost/' + id);
}
如上面的代码所示,您已使用已编辑项目的 ID 触发了到添加帖子页面的重定向。在添加帖子页面中,您将获得带有传递的 ID 的博客帖子的详细信息并填充详细信息。
修改路由器以在添加帖子页面中包含可选的 id 参数。
在 `AddPost` 组件内,创建一个名为 `getPostWithId` 的方法,以使用 `id` 获取博客文章的详细信息。在 `getPostWithId` 方法内,对 `app.js` 内的 `getPostWithId` API 进行 AJAX 调用。
getPostWithId(){
var id = this.props.params.id;
var self = this;
axios.post('/getPostWithId', {
id: id
})
.then(function (response) {
if(response){
self.setState({title:response.data.title});
self.setState({subject:response.data.subject});
}
})
.catch(function (error) {
console.log('error is ',error);
});
}
通过从 `getPostWithId` API 方法收到的响应,您已更新状态变量 `title` 和 `subject`。
修改 `title` 和 `subject` 文本框以显示状态变量的值。
现在,让我们在 `app.js` 中创建 `getPostWithId` API,以对 MongoDB 数据库进行数据库调用,以获取具有特定 ID 的帖子详细信息。这是 `getPostWithId` API 方法:
app.post('/getPostWithId', function(req,res){
var id = req.body.id;
post.getPostWithId(id, function(result){
res.send(result)
})
})
在 `post.js` 文件中,创建一个方法 `getPostWithId` 来查询数据库以获取详细信息。其外观如下:
getPostWithId: function(id, callback){
MongoClient.connect(url, function(err, db){
db.collection('post').findOne({
\_id: new mongodb.ObjectID(id)
},
function(err, result){
assert.equal(err, null);
if(err == null){
callback(result)
}
else{
callback(false)
}
});
})
}
如上面的代码所示,您使用了 `findOne` API 来获取具有特定 ID 的博客文章的详细信息。
保存以上更改并尝试运行程序。单击主页上的编辑图标,它将重定向到添加帖子页面并填充标题和主题。

现在,要更新博客文章详细信息,您需要检查 `id`在 `app.js` 中的 `addPost` API 方法内。如果是新帖子,则 `id` 将为 `undefined`。
修改 `AddPost` 组件中的 `AddPost` 方法以包含 `id` 状态变量。
axios.post('/addPost', {
title: this.state.title,
subject: this.state.subject,
id: this.state.id
})
在 `addPost` API 方法中,您需要检查 `id` 参数是否为 `undefined` 。如果`undefined`,则表示这是一个新帖子,否则需要调用update方法。 `addPost` API 方法如下所示:
app.post('/addpost', function (req, res) {
var title = req.body.title;
var subject = req.body.subject;
var id = req.body.id;
if(id == '' || id == undefined)
post.addPost(title, subject ,function(result){
res.send(result);
});
}
else{
post.updatePost(id, title, subject ,function(result){
res.send(result);
});
}
})
在 `post.js` 文件中,创建一个名为 `updatePost` 的方法来更新博客文章详细信息。您将利用 `updateOne` API 来更新具有特定 `id` 的博客文章的详细信息。以下是 `updatePost` 方法的外观:
updatePost: function(id, title, subject, callback){
MongoClient.connect(url, function(err, db) {
db.collection('post').updateOne(
{ "\_id": new mongodb.ObjectID(id) },
{ $set:
{ "title" : title,
"subject" : subject
}
},function(err, result){
assert.equal(err, null);
if(err == null){
callback(true)
}
else{
callback(false)
}
});
});
}
保存以上更改并重新启动服务器。登录应用程序并点击编辑图标。修改现有值并单击按钮更新详细信息。
## 实现删除帖子功能
要实现删除帖子功能,您需要将点击事件附加到删除图标。修改删除图标跨度如图:
如上面的代码所示,您已将帖子 ID 作为参数传递给 `deletePost` 方法。
在 `ShowPost` 组件中创建一个名为 `deletePost` 的方法。
deletePost(id){
}
在`ShowPost`组件构造函数中绑定该方法。
this.deletePost = this.deletePost.bind(this);
要在 `map` 函数回调中使用 `this`,您需要将 `this` 绑定到 `map` 函数。修改`map`函数回调如图:
{
this.state.posts.map(function(post,index) {
return
| {index+1} |
{post.title} |
{post.subject} |
|
|
}.bind(this))
}
在 `deletePost` 方法中,在调用删除 API 之前添加确认提示。
deletePost(id){
if(confirm('Are you sure ?')){
// Delete Post API call will be here !!
}
}
现在让我们在 `app.js` 文件中添加 `deletePost` API。 API 将从 AJAX 调用中读取帖子 ID 并从 MongoDB 中删除该条目。以下是 `deletePost` API 的外观:
app.post('/deletePost', function(req,res){
var id = req.body.id;
post.deletePost(id, function(result){
res.send(result)
})
})
如上面的代码所示,您将调用 `post.js` 文件中的 `deletePost` 方法并返回结果。让我们在 `post.js` 文件中创建 `deletePost` 方法。
deletePost: function(id, callback){
MongoClient.connect(url, function(err, db){
db.collection('post').deleteOne({
\_id: new mongodb.ObjectID(id)
},
function(err, result){
assert.equal(err, null);
console.log("Deleted the post.");
if(err == null){
callback(true)
}
else{
callback(false)
}
});
})
}
如上面的代码所示,`post.js` 文件中的 `deletePost` 方法将使用 `MongoClient` 连接到MongoDB 中的博客数据库。使用从 AJAX 调用传递的 `Id` ,它将从数据库中删除该帖子。
更新 `home.jsx` 文件中 `deletePost` 方法内的代码,以包含对 `deletePost` API 的 AJAX 调用 `app.js` 文件。
deletePost(id){
if(confirm('Are you sure ?')){
var self = this;
axios.post('/deletePost', {
id: id
})
.then(function (response) {
})
.catch(function (error) {
});
}
}
删除博客文章后,您需要刷新博客文章列表以反映这一点。因此,创建一个名为 `getPost` 的新方法,并将 `componentDidMount` 代码移到该函数内。这是 `getPost` 方法:
getPost(){
var self = this;
axios.post('/getPost', {
})
.then(function (response) {
console.log('res is ',response);
self.setState({posts:response.data})
})
.catch(function (error) {
console.log('error is ',error);
});
}
修改`componentDidMount`代码,如图:
componentDidMount(){
this.getPost();
document.getElementById('homeHyperlink').className = "active";
document.getElementById('addHyperLink').className = "";
}
在 `deletePost` AJAX 调用成功回调内,调用 `getPost` 方法来更新博客文章列表。
deletePost(id){
if(confirm('Are you sure ?')){
var self = this;
axios.post('/deletePost', {
id: id
})
.then(function (response) {
self.getPost();
})
.catch(function (error) {
console.log('Error is ',error);
});
}
}
保存以上更改并重新启动服务器。尝试添加新的博客文章,然后从网格列表中单击“删除”。系统将提示您一条删除确认消息。单击**确定**按钮后,该条目将被删除,并且博客文章列表将被更新。

## 总结
在本教程中,您了解了如何在 React 博客应用程序中实现删除和更新博客文章功能。在本教程系列的下一部分中,您将了解如何为登录用户实现个人资料页面。
请在下面的评论中告诉我们您的想法和建议。本教程的源代码可在 GitHub 上获取。
以上就是在基于 React 的博客应用程序中更新和删除帖子:第 4 部分的详细内容,更多请关注知企PROSAAS其它相关文章!
**Tags:** ajax, github, html, http, JS, map, mongodb, node.js, td, this
**Categories:** WordPress
---